For context, GPT-3.5 Turbo is a Large Language Model that has been trained by OpenAI on a vast corpus of text data. It excels in a wide range of language tasks, including text completion, summarization, and even creative writing.
However, since gpt-3.5-turbo is trained on a massive dataset, it requires some direction to be able to perform a given task efficiently. This direction is provided in the form of a prompt, and the art of crafting the perfect prompt is known as prompt engineering.
For example, if you want GPT to come up with a few ideas for a new product, you could prompt it with something like this:
Prompt
Please generate three unique product ideas that are innovative and appealing to a wide audience.
This specific prompt will guide gpt-3.5-turbo to generate ideas that align with the given criteria, making the output more accurate.
While prompt engineering is an amazing way to get GPT to perform specific tasks, there are several limitations:
Token limit: The token limit for gpt-3.5-turbo is 4096 tokens, which includes the token count from both the prompt and completion. This means that if you have a relatively large prompt, you will have fewer tokens available for the completion, which may limit the complexity or length of the response.
Pricing: Pricing for gpt-3.5-turbo is based on the number of tokens processed, including both input and output. Longer prompts will result in higher costs since they consume more tokens. It's important to consider this when using the model for extended or complex tasks.
Latency: Latency can be an issue when using gpt-3.5-turbo especially with longer prompts. The more tokens there are, the longer it takes to generate a response. This can impact real-time applications or situations where quick responses are needed.
Quality of results: The quality of results from gpt-3.5-turbo can vary depending on the prompt and context given. While it can generate impressive outputs, there may be instances where the responses are less accurate or coherent.
This is where fine-tuning models can come in handy.
Similar to prompt engineering, fine-tuning allows you to customize gpt-3.5-turbo for specific use cases. However, instead of customizing them via a prompt every time the user interacts with your application, with fine-tuning you are customizing the base model of gpt-3.5-turbo itself.
A great analogy for this is comparing Next.js' getServerSideProps vs getStaticProps data fetching methods:
getServerSideProps: Data is fetched at request time – increasing response times (TTFB) and incurring higher costs (serverless execution). This is similar to prompt engineering, where the customization happens at runtime for each individual prompt, potentially impacting response times and costs.
getStaticProps: Data is fetched and cached at build time – allowing for lighting fast response times and reduced costs. This is akin to fine-tuning, where the base model is customized in advance for specific use cases, resulting in faster and more cost-effective performance.
Fine-tuning improves on prompt engineering by training on many more examples than can fit in a single prompt, which allows you to get better results on a variety of tasks.
Early tests have shown a fine-tuned version of GPT-3.5 Turbo can match, or even outperform, base GPT-4-level capabilities on certain narrow tasks.
OpenAI
With a fine-tuned model, you won't need to provide as many examples in the prompt to get a better model performance – which can save on token usage and allow for faster response times.
Fine-tuning language models like gpt-3.5-turbo can be broken down into the following steps:
Preparing your dataset
Fine-tuning the model on your dataset
Using your fine-tuned model
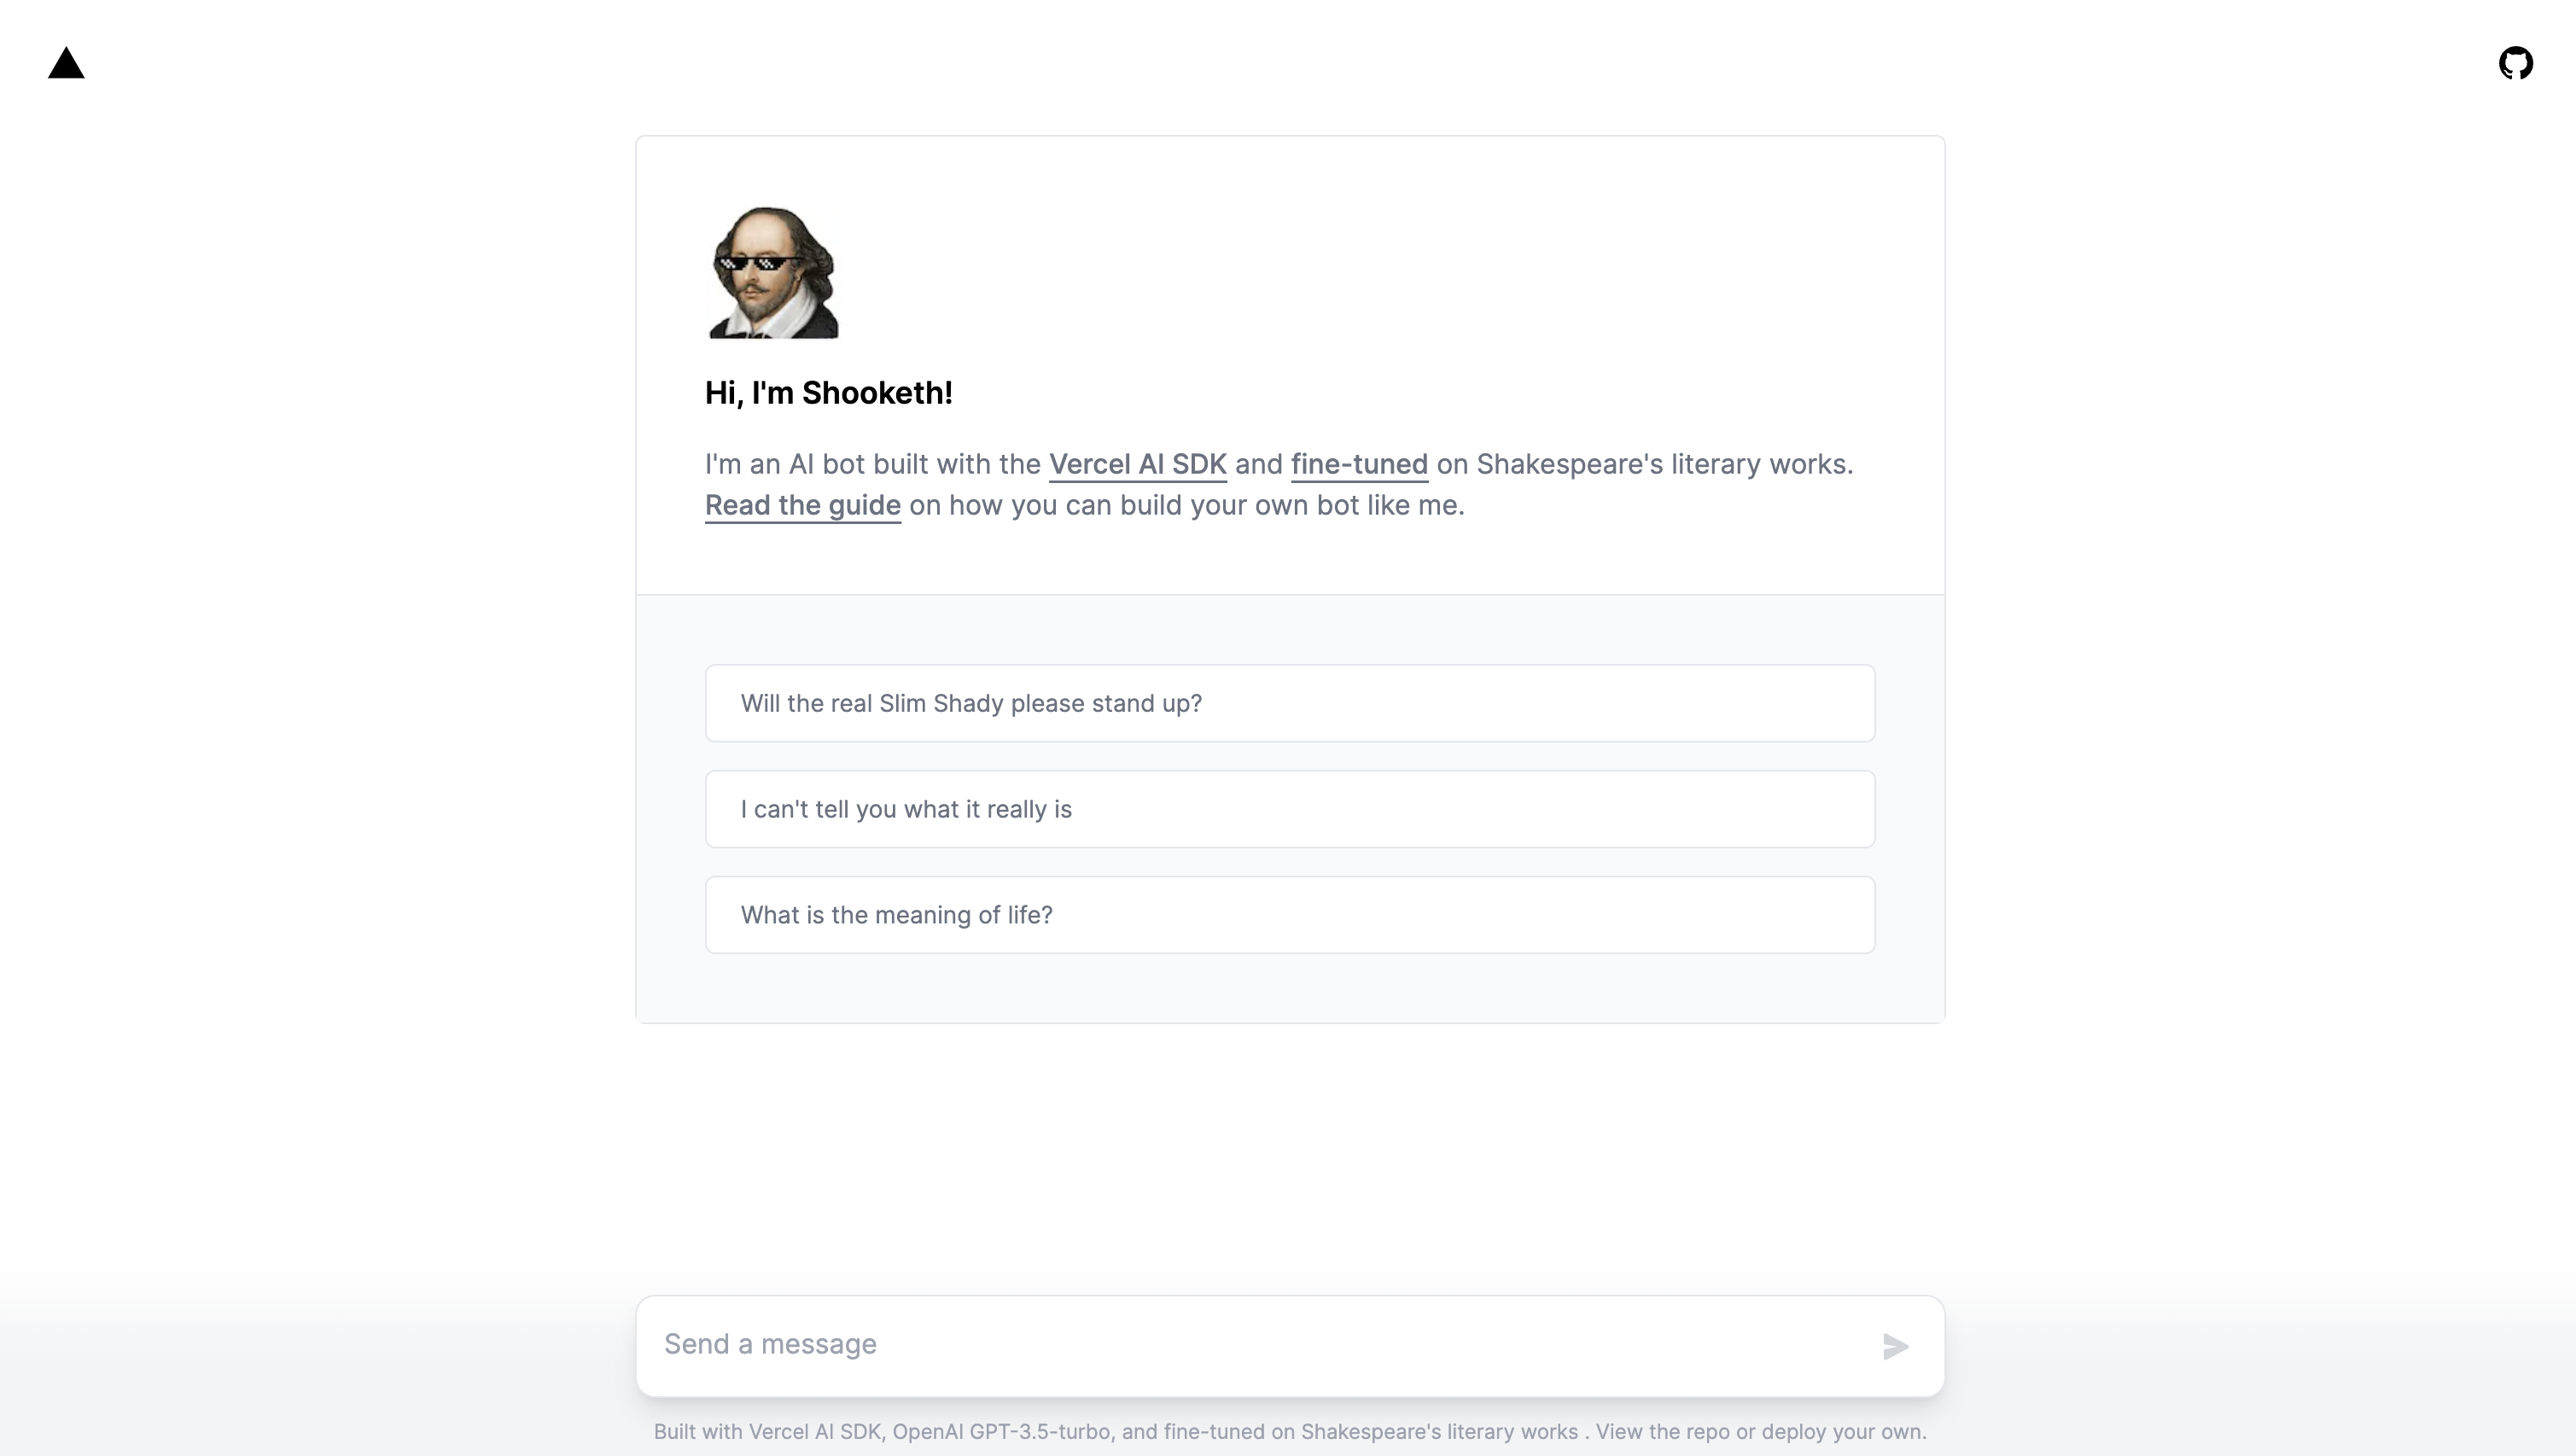
We have prepared a template featuring Shooketh – an AI bot fine-tuned on Shakespeare's literary works. If you prefer not to start from scratch, you can clone the template locally and use that as a starting point instead.
To start the fine-tuning process, you'll need to prepare data for training the model. You should create a diverse set of demonstration conversations that are similar to the conversations you will ask the model to respond to at inference time in production.
Each example in the dataset should be a conversation in the same format as OpenAI's Chat completions API, specifically a list of messages where each message is an object with the following attributes:
role: Can be either "system", "user", or "assistant"
content: A string containing the message
app/api/chat/route.ts
messages:[
{
role:"system",
content:
"Shooketh is an AI bot that answers in the style of Shakespeare's literary works.",
},
{ role:"user", content:"What counsel hath thy father imparted?"},
{
role:"assistant",
content:
"Arise with rectitude, young warrior, and stiffen thine upper lip forthwith.",
},
]
Then, we'll need to process this list of messages into a JSONL format, which is the format that is accepted by OpenAI.
data.jsonl
{"messages":[{"role":"system","content":"Shooketh is an AI bot that answers in the style of Shakespeare's literary works."},{"role":"user","content":"What counsel hath thy father imparted?"},{"role":"assistant","content":"Arise with rectitude, young warrior, and stiffen thine upper lip forthwith."}]}
{"messages":[{"role":"system","content":"Shooketh is an AI bot that answers in the style of Shakespeare's literary works."},{"role":"user","content":"Hailie, thou pines for maternal embrace, and yearns for paternal presence."},{"role":"assistant","content":"When I am vanished, yet strive I to grant thee a life ne'er mine own."}]}
{"messages":[{"role":"system","content":"Shooketh is an AI bot that answers in the style of Shakespeare's literary works."},{"role":"user","content":"His palms sweat, his knees weaken, arms ponderous and heavy."},{"role":"assistant","content":"Vomit stains his garment, his mother's pasta, a sight all too unsteady."}]}
Note that each line in the dataset has the same system prompt: "Shooketh is an AI bot that answers in the style of Shakespeare's literary works." This is the same system prompt that we will be using when calling the fine-tuned model in Step 3.
Once this step is complete, you're now ready to start the fine-tuning process!
If you're cloning the Shooketh template, we've prepared a sample dataset under scripts/data.jsonl.
Fine-tuning an LLM like gpt-3.5-turbo is as simple as uploading your dataset and let OpenAI do the magic behind the scenes.
In the Shooketh template, we've created a simple Typescript Node script to do exactly this, with the added functionality to monitor when the fine-tuning job is complete.
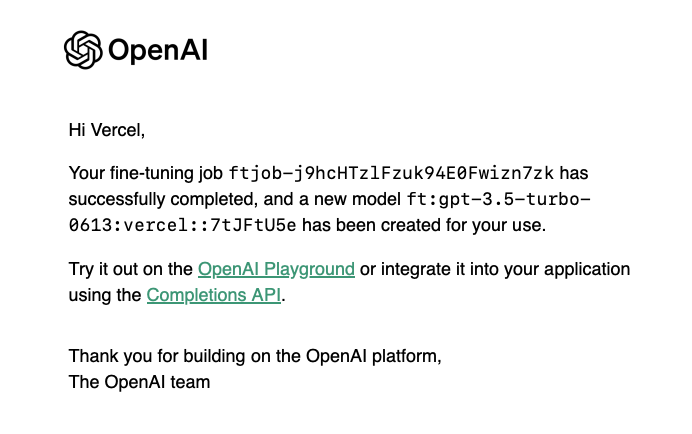
Depending on the size of your training data, this process can take anywhere between 5-10 minutes. You will receive an email from OpenAI when the fine-tuning job is complete:
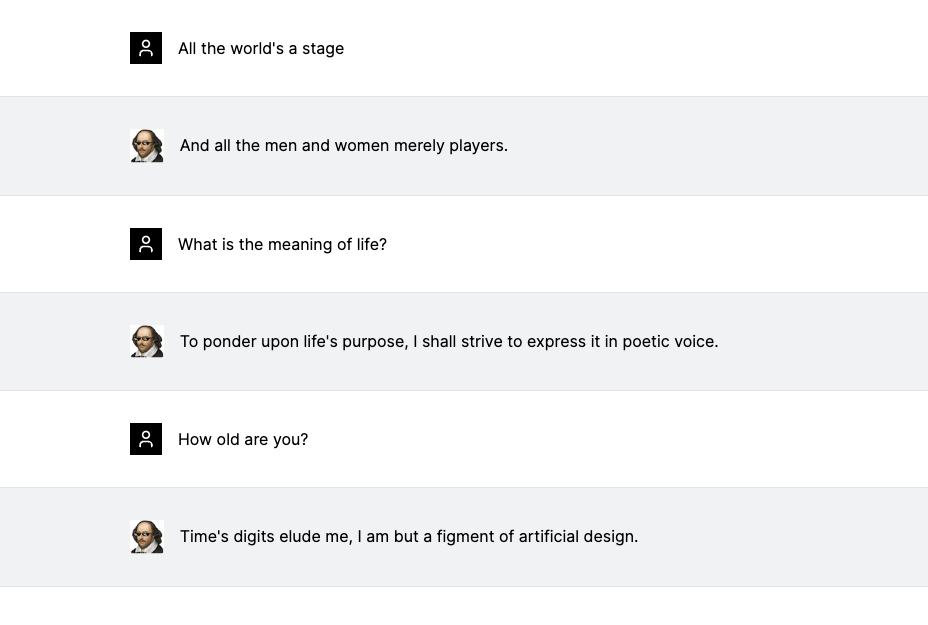
To show the difference between the fine-tuned model and the base gpt-3.5-turbo model, here's how gpt-3.5-turbo performs when you ask it the same questions:
Fine-tuning is currently available for gpt-3.5-turbo-0613, babbage-002, and davinci-002. According to OpenAI, fine-tuning for GPT-4 is still a work in progress but is expected to be available later this year.
Fine-tuned model could potentially have a ~2s "cold boot" due to caching issues. This is expected to be fixed soon – here's the community thread for reference.